Sunday, 4 January 2015

Second Garden Block Finished

<a href="http://www.bloglovin.com/blog/12932553/?claim=ce7dvdmyv47">Follow my blog with Bloglovin</a>
I have finished stitching the second block of the garden quilt
I am enjoying doing the embroidery for each block and looking forward to showing the ladies at the craft group, they will be doing a block a month so I need to be a good few blocks ahead of them.
 I did toy with the idea of changing the fabric order on the patchwork, in the end I decided to stick with the original lay out.
I have been busy organising my cabin and getting towards the end of the boxes, I have come across a lot of unfinished sewing and knitting projects and now have them in view and aim to big a big dent in them this year.
I have organised the sewing textile end of my cabin.
Its great having everything within reach
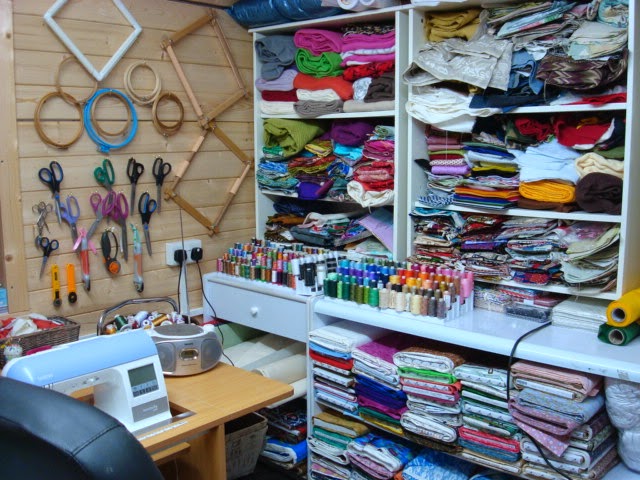
I have no plans to be buying any more fabric for a long long time
The same goes for yarn, a lot of these pigeon holes have unfinished projects in them, so no new ones started and no new craft stash until there is some empty holes there, having this unit has created a sewing area for me, or a clean crafting area, this is the smaller end of the cabin, the other end is still being organised but I am making progress.

Saturday, 27 December 2014

The first Garden Quilt Block

I did get the embroidery finished on the first block and patch worked it.
I will cut the same fabric for the craft club to use with there blocks, I have enough of it, it came from the bales of fabric when we shut the shop, I will use the same fabric for all the blocks.
I have now started stitching out the next block
I am hoping to have the first three blocks completed to show them when the craft club starts up again in January.

Tuesday, 23 December 2014

Stitching For Summer

I started on a summer stitching project yesterday
It will become a quilted wall hanging, there are nine blocks in total, each one has an embroidered design in the middle, this is a project I am putting together for the ladies at the craft club, each block will introduce them to a new stitch or technique, this block is using a basic back stitch and colonial knots.
Once the stitching is completed it will be turned into a patchwork block. 
It is not my design but one I have adapted from Red Brolly, I will provide the ladies with the materials they need to complete each block and will be on hand to help them with instructions, I will post when i have finished the block hopefully it will be done later today.

Sunday, 21 December 2014

Frosty The Snowman

Mister Frosty
He was made last year a very quick and easy decoration, he was made from a pillow case, in fact you can get two from a pillowcase.
Cut up the middle lengthwise, sew up the new cut sides, you now have two long tube shapes, 
fill with stuffing of your choice, I used polystyrene beads, you want it stuffed so it is fairly firm and will stand up. Sew up the bottom then you need to create some shape, divide it roughly into thirds and tie with string, your snowman body has now three sections, decorate one at the end with a face, sew on some buttons, I made a scarf and hat from some bits of an old fleece blanket and decorated with foam snowflakes. 
My snowman's face was embroidered on but you can easily do it with felt of fabric shapes and glue them on, or use safety eyes.

Friday, 5 December 2014

Christmas Star

I have my sewing machine back from being serviced, it had a good clean and few springs and thread cutter replaced in total it cost me £54.90 I am more than happy with that.
I have been busy getting the cabin organised now I have some units that I am re-using from the shop, I can set my machine up to work and leave it to work while I unpack boxes.
I came across a design for a lovely embroidered Christmas Star table centre, I dug out some gold coloured fabric that came from my sister and set do doing the star.
each segment of the star is made individually, I needed eight segments, 
they then get joined together in a star shape
This is the completed star, after making it I realised I could make it bigger by adding an outer section, it would mean making another 16 sections and joining them in.
The segments are easy to join up, you just but them together and do a zig zag stitch along the join.
The star is a nice size its 16 inches across. It could be recreated with out the embroidery on any sewing machine, it is only diamond shapes that are backed with felt joined together, I might have a go at doing a patchwork one, time permitting.

Friday, 28 November 2014

Working On UFO's

While going through boxes and unpacking craft stuff in the cabin, I have several unfinished projects a couple are big projects and I really want to get them finished.
Remember this part work 
 I collected every issue, it finished start of this year, each copy came with the fabric to do a patchwork block you then make it all up like the quilt on the front cover, with moving packing and such like I fell behind doing the blocks, it was all packed in a box together, I want to crack on and get the blocks finished now

These are the blocks I have done so far
 and another four done that I got completed today.
I think there is 70 blocks in total I have completed 22 so a fair way to go yet.
It makes up a complete double bed sized quilt, I do like part works, I know they seem expensive but having it all organised and sorted for you is great, if I had to choose all the fabrics and work out the designs and layouts for each block I wouldn't have got past 4 blocks I don't think.
A bonus is the extra projects you get with each copy too and there is some lovely projects.
 

Thursday, 27 November 2014

Fabric Christmas Trees

I picked up a copy of Homemaker magazine yesterday while out shopping
It came with a little kit to make the fabric trees on the front cover, I made mine up slightly different
I stitched mine on the top and cut round them with pinking shears, I added to hot fix gems and some organza bows on the tree top, I decorated the spools with tartan ribbon.
Word of warning, the spools on the front cover are not the ones you get with the kit you get those tiny ones that are on mine and you don't get enough stuffing for the trees, just as well I had plenty. 
I think they would be very easy to do from felt and very effective, you only need to stitch two triangles together leave an opening to stuff.
I also picked up a copy of Sew Home and Style
You get a kit to make this Santa
I haven't made it yet, again I think it needs jazzing up,
These little cuties caught my eye
Little felt coat tree decorations
I fancy making up some of these.don't know if it will be in time for this year :-)